Create stunning movies with Movavi Video Editor in six easy steps: download, add photos, apply filters, add animated transitions, include subtitles and music, and save your video. Section 2 introduces Fastreel for online video creation, supporting various file types. Section 3 highlights Google Photos’ simplicity in video creation on different devices. Whether using Movavi, Fastreel, or Google Photos, making videos from photos is now more accessible than ever.
Delving into this guide, we will delve into the process of creating a video with pictures on your device or laptop. Numerous methods exist for transforming pictures into videos, and a straightforward free download may be all you require to begin. Making slideshows or creating content for websites like YouTube and other video apps benefits greatly from the ability to convert an image to a video. Additionally, certain devices feature a built-in photo video maker tailored for your photographic needs.
Follow these simple steps to unleash your creativity:
In this article:
Section 1: Create Stunning Movies with Movavi Video Editor
Embark on an easy and enjoyable journey to create stunning movies solely from your photos using Movavi Video Editor. Overcome any reservations about movie-making – Movavi Video Editor simplifies the process, requiring no special skills or extensive knowledge. This photo movie maker effortlessly converts images to videos, guiding you through each step.
Step-by-Step Guide with Movavi Video Editor:
Step 1. Download Movavi Video Editor
Initiate your movie creation by downloading Movavi Video Editor. Install the photo video maker and commence crafting your movie with pictures, photos, and music instantly.
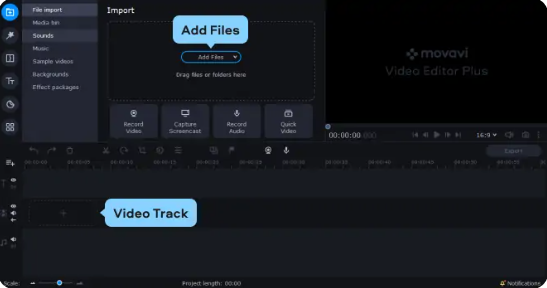
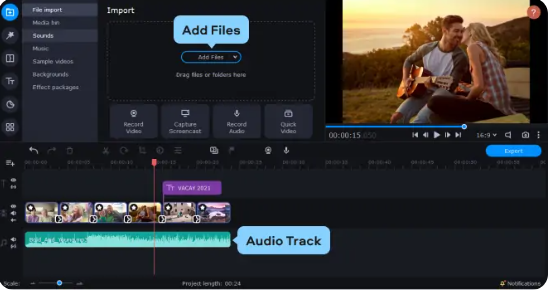
Step 2. Add Your Photos to the Picture Video Maker
Launch Movavi Video Editor, click the Add Files button, and select the files you wish to use. The photos will be displayed in the Media Bin; drag and drop them into the Video Track. You can also drag and drop files straight from the folder into which they are stored. Sort your media files into the desired sequence.
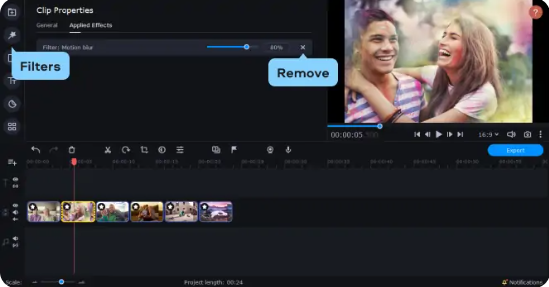
Step 3. Add Filters
Enhance your photos by incorporating exciting filters. Click the Filters tab, choose your preferred filter, and drag it onto the desired photo. Apply multiple filters from different categories to a single image. Easily remove a filter by clicking the star button, choosing the filter, and pressing Remove.
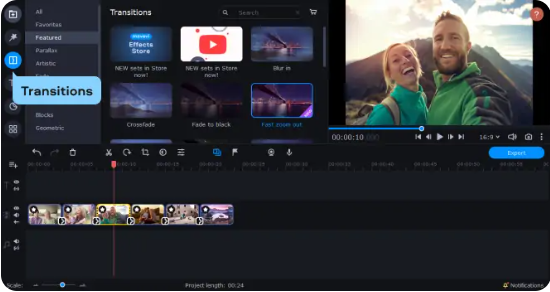
Step 4. Add Animated Transitions
If you want to apply transitions to every clip at once, click the button with the mountain icon above the timeline. Choose your favorite style of transition and enter the length of the transition in the dialogue box that appears. You can also change the length of the slide in the same window.
To see every transition that is available, click the Transitions tab and drag the transitions you want to use to the appropriate places on the timeline.
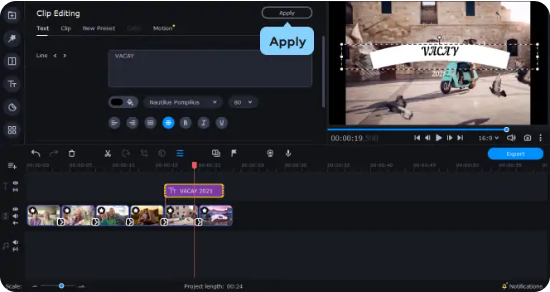
Step 5. Jazz Up Your Video with Subtitles and Music
Enhance your movie with engaging subtitles by navigating to the Titles tab. Choose your preferred title style and effortlessly drag it to the Titles Track.

To customize your titles, simply double-click and enter your text in the preview window. Explore various options such as color, style, and more. Save your edits by clicking the Apply button in the upper right corner of the preview window.

Once your titles are in place, head back to the Import tab. Click on Add Files to seamlessly select a fitting song or instrumental track for your movie. Alternatively, drag a sound file from its storage folder onto the Audio Track, distinguished by a musical notation.
Step 6. Save Your Video
Once your project is finalized, save your work by clicking on Export and opt for the suitable option based on your intended use for the video. If you plan to view it on a computer, choose the Save Video File tab. For transferring to a mobile device, navigate to the respective tab for Apple, Android, or another device.
Alternatively, streamline the process by uploading your video directly to YouTube or Google Drive. Click on Upload online to initiate this step. Next, select the necessary video preset or output format, specify the filename and desired folder, and then click Start. Voila! Creating a video from your pictures has never been more straightforward.
Now equipped with the knowledge of swiftly transforming photos into a captivating video, dive in and experience the efficiency of this potent picture-to-video maker! Craft a video from your cherished moments and effortlessly share them with friends on your blog, Facebook, and various other social networks. Illuminate your life’s highlights through the seamless creation of engaging videos.
🎬 Don’t miss out! Unleash your creativity with Movavi Video Editor NOW! Seize the moment and edit like a pro with a jaw-dropping 40% OFF! Limited time only!
Section 2: Online Video Creation with Fastreel
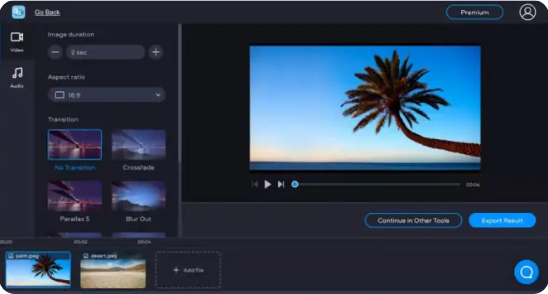
To produce a video from pictures online, Fastreel is a convenient tool designed for this purpose. In addition to supporting JPG, PNG, or GIF files, it can also be used to convert images to video and supports movie files up to 500 MB in size, including MP4, MOV, MKV, AVI, and WMV. Fastreel facilitates the creation of slideshows or videos, enabling users to incorporate music, set transitions, adjust frame display duration, and add text if desired. Follow these steps to use Fastreel:
How to make a video from photos using Fastreel.
- Upload Files: Drag and drop your images or movie files onto the Fastreel app.
- Configure Settings: Choose transition types, set frame display durations, and add music from the free audio collection or upload your own audio file. Optionally, include text.
- Export Video: When ready, click “Continue” and select a save formatting option from the menu. Click “Save” to transform your photos into a video online.
Section 3: Google Photos –Simplifying Video Creation
for a number of years now, Google Photos has been a very good way of organizing photos and storing them. It’s easy and user friendly to create a video of your pictures that can be accessed on any PC or device, as well as via the Google Photos service for iPhones and devices. You can easily access your images from any device with this process, which is fast and simple.
Making a Video on a PC
- Open Google Photos on the website and log in.
- Click on “Utilities” in the left menu, then select “Create new” to start a movie project.
- Choose the photos you want for the video and click “Done” to generate the video.
Making a Video on an Android Device:
- Download and install the Google Photos app, then sign in.
- Tap on “Library,” go to “Utilities,” select “Create new,” and choose “Movie.”
- Pick the photos or video clips, tap “Create” to combine them, and then tap “Save” to generate the movie.
- Optionally, select a theme for your video and tap “Play” to preview it.
Making a Video on an iOS Device:
- Download and install the Google Photos app on your iPhone or iOS device and log in.
- Tap “Library,” go to “Utilities,” choose “New Movie,” and select your photos or videos.
- Tap “Create” at the top right to generate the video.
- Save the video and choose a theme if desired. You can also use basic tools to edit the video before sharing or uploading.
Conclusion
Whether you prefer the user-friendly Movavi Video Editor, the quick online solution with Fastreel, or the seamless experience with Google Photos, creating videos from your photos has never been more accessible. Choose the method that suits you best and share your visual stories effortlessly.
Never miss out on this special discount for purchasing. We will help you save 40% on Movavi Video Editor. Hurry up! The time is limited!
FAQs
1. Does Movavi have a watermark?
When using a trial version, Movavi software typically adds a watermark to the file. Trial versions come with some limitations and are limited to a certain amount of time after installation, even though they provide all of the features of the full version of the software.
2. Does Movavi reduce video quality?
Movavi Video Converter not only allows you to modify video formats and reduce file sizes but also offers various other functionalities. One such capability includes the option to decrease video resolution.
3. Should I add subtitles to my music video?
It is advisable to include subtitles in your music video because they improve comprehension, especially for people without hearing impairments and in noisy environments. Moreover, adding subtitles to your video can help it rank higher in search results.