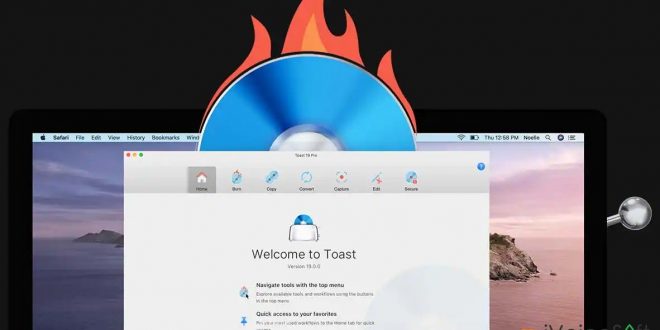
The default burning mode for video discs in Toast is MyDVD, which allows you to create multimedia disc projects that include menus and music.
In this article:
Overview: Steps to Create a Video Disc Project
There are multiple ways to create and customize your video project.
The fundamental steps for creating a project include:
- Choose a project template.
- Organize your videos by adding submenus.
- Import the media files you want to include.
- Enter names for the menu and submenu lists in Edit mode.
There are additional optional customizations available to enhance your video project:
- Insert chapter points into videos, which is particularly useful for longer videos.
- Modify the background picture used in the template.
- Edit the layout of the menus.
- Adjust the background music for the menus.
Preparation Before Starting
Before beginning your project, it is advisable to consider the organization of your media. MyDVD utilizes a tree structure and submenus to effectively organize projects.
Let’s examine an illustrative project as an example.
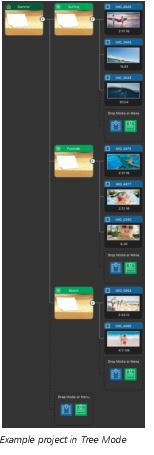
Assume you have a collection of video clips from a weekend excursion. For your project, you want to feature the top clips from three different activities. Your main menu will be titled “weekend day,” and you plan to create submenus for each activity:
- Surfing (consisting of 3 video clips)
- Poolside (consisting of 3 video clips)
- Beach (consisting of 2 video clips)
In this scenario, you can use the chosen template from the Themes tab that allows up to four items per menu. If any of the activity groups have more than four videos, you can create submenus within that category. For example, if there were nine surfing videos, you could create submenus based on participants: Mom (3 videos), Dad (2 videos), and Kids (4 videos).
🔔 Please be aware that the number of items allowed per menu in the templates is predetermined. Some templates can accommodate a maximum of two items per menu, while others can handle three or four items. It’s essential to choose a template that suits your content requirements and ensures that your videos are appropriately organized.
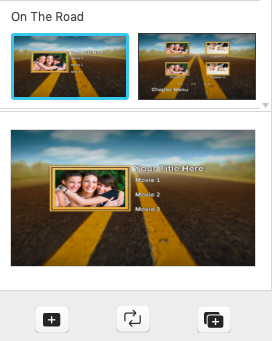
The left side of the Themes tab displays thumbnails for the main menu and submenus. You’ll see a thumbnail for the chapter menu on the right side, which is generally utilized for longer videos. You can choose a thumbnail by clicking on it, and a blue outline will emerge around it. You can also preview the selected menu at the bottom of the panel. The example template supports up to three items per menu, as indicated by the placeholders “Movie 1,” “Movie 2,” and “Movie 3.”
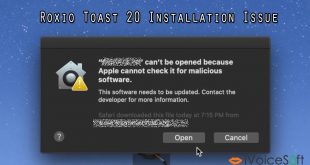
🔥 If you want to save money on Roxio Toast 20, hurry up and use our special coupon code to get a significant discount on Roxio Toast 20.
⚡️ Hurry, it won’t last long – seize it while you can!
How to create a video disc (DVD or BD disc)
- Open Toast and go to the Burn tab. In the Burn Videos area, select the desired format:
- DVD
- Blu-ray Disc (available in some versions),
- HD on DVD.
- In the Media Browser panel, click the Theme tab. Choose a template for your video disc from the available options.
- Click the plus button below “Design new template” for more possibilities if you want to design a custom template.
- Drag the selected template from the Media Browser to the Root Menu box in the Tree Mode area.
- Click the Media tab in the Media Browser panel and navigate to the video files you want.
- In the Tree Mode area, you can organize your project to accommodate your media by following these steps:
- To assign a title to the main menu, click on the Root Menu and enter a new name.
- To add a submenu, click on the Submenu icon. Then click on Sub Menu and enter a name for the submenu.
- If you want to remove a menu, hover over the thumbnail of the menu you wish to delete and click on the Delete icon located in the upper right corner.
🔔 It’s worth noting that you can change the zoom level for the tree view by dragging the Zoom slider situated beneath the Tree Mode section.
Once you have organized the structure of your project, follow these steps to proceed:
- Drag each of your media files from the Media Browser to the Add Media icon corresponding to the desired menu.
- After adding your media files, you can perform additional editing tasks. For more detailed information on To adding Chapters to Your Video or To modify the layout, background imagery, or music of your menu, refer to the relevant sections.
- To ensure your project fits within the disc capacity, check the Project size bar located at the bottom of the window. You can also verify the disc size by selecting the appropriate option from the Disc size drop-down menu situated to the right of the bar.
- Click the Preview Disc button, located below the Tree View area, to preview and test the menu setup and video playback. This step allows you to ensure that everything is as desired before proceeding further.
- When you’re through with your project, go to the Output Settings section. Enter a title for your project, choose the output format and location, and configure a When Complete action for the burning process.
- Finally, click the red Burn button to initiate the burning process and create your video disc.
🔔 You can alter the menu of your project by picking a new theme from the Themes tab and dragging it to the chosen menu in the Tree area. If you wish to apply the selected template to the entire project, simply click the “Apply theme to all menus” option.
To adding Chapters to Your Video
- Locate the video you wish to add chapters to in the Tree panel and click on its thumbnail.
- In the lower-right corner of the thumbnail, you will find the Chapter icon. Click on it. This action will open a Chapters tab in the Media Browser.
- On the Chapters page, you have two options:
- Option 1: Drag the scrubber along the time bar or use the playback controls to navigate to the desired chapter position. Then, click the “Add chapter” button below the video preview.
Note: If the time interval between chapter points or between the start and end of the video is less than 10 seconds, the button will be unavailable. - Option 2: In the “Automatically create chapters” area, specify time intervals for chapters by entering values for Minutes and Seconds. Finally, click the “Create Chapters” button.
As a result, the chapter points and corresponding thumbnails will be added to the tree for easy navigation.
- Option 1: Drag the scrubber along the time bar or use the playback controls to navigate to the desired chapter position. Then, click the “Add chapter” button below the video preview.
- In the Tree area, select the thumbnail of the menu you wish to edit.
- Below the Tree area, click the Edit button.
- Perform any of the following actions:
- To change the menu layout, click on an object in the Edit area and drag it to a new position.
- To change the menu music, click on Add Music and navigate to the audio file you want to use.
- To change the background image, click on Add Background Image and navigate to the image file you want to use.
- To review the changes you’ve made, click the Play button.
- Once you’re done with the edits, click the Edit button again to return to the Tree area.
Note: If you want to remove a custom song or image from your project, simply click the Remove button located next to the respective song or image name below the Edit area.
🎁Get your Roxio Toast 20 discount code immediately and start saving big!
Don’t pass up this wonderful opportunity to acquire Roxio Toast 20 at a low price!💥