For software developers, having access to a local database is crucial. However, certain databases, such as Microsoft SQL, rely on the x86_64 architecture and might not be compatible with the latest Mac computers powered by Apple Silicon’s ARM64 technology.
Can Microsoft SQL be Utilized on Any Mac?
Regrettably, Microsoft SQL lacks support across macOS platforms, including those equipped with older Intel chipsets.
In this article, I will provide a comprehensive walkthrough on how to run Microsoft SQL, a widely utilized database engine, on your high-performance Apple Silicon Mac by utilizing Docker Desktop.
Please be aware that this guide solely focuses on setting up the SQL server itself and does not encompass the supplementary tools that accompany Microsoft SQL Server.
It’s important to note that this solution serves as a temporary workaround, allowing you to engage with the database engine until a version compatible with Apple Silicon is released by Microsoft.
While some individuals have devised scripts to operate Microsoft SQL within a Windows virtual machine (VM), these approaches often lack support for TCP connections, rendering them unsuitable for applications functioning on the host machine. Hence, we will leverage Docker Desktop to execute the container and establish a connection with your Mac.
Although this is not a permanent solution, it provides a means to interact with the database engine until a native version is made available.
As of the time of writing, Docker Desktop stands as the sole container runtime environment for Apple Silicon that provides support for x86_64 containers via the Rosetta feature.
Although this feature remains in the beta phase, it adequately fulfills our requirements within this context.
Now, let’s delve into the step-by-step process.
In this article:
Prerequisites for Running Microsoft SQL on Apple Silicon Macs with Docker Desktop
To successfully run Microsoft SQL on your Apple Silicon Mac using Docker Desktop, you’ll need the following:
- An Apple Silicon processor-based Mac
- The Docker daemon and Docker Desktop UI installed on your Mac.
While you have the option to choose any user interface (UI) tool for Docker, such as Orb or Podman Desktop, this guide will focus on using Docker Desktop. For alternative tools, you’ll need to manually activate Rosetta support in the Docker daemon. Please note that this feature is in its beta stage at the time of writing.
Preparing for the Process
Before running Microsoft SQL Server, we need to configure Docker to accommodate x86-64 containers. To achieve this, we will leverage the Apple Virtualization framework with Rosetta enabled. Let’s prepare your machine for this setup.
1. Installing Docker and Docker Desktop
If you don’t have Docker and Docker Desktop installed already, you’ll need to do so before you begin.
2. Enabling x86 Emulation with Rosetta (Beta)
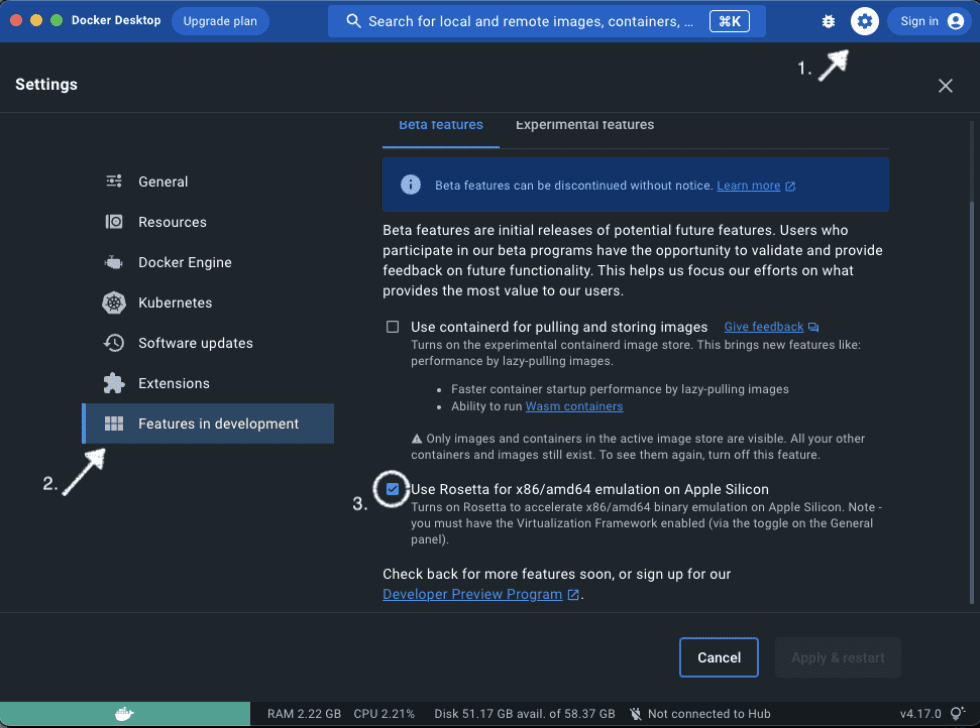
For users of Docker Desktop, the user interface provides a straightforward way to adjust these settings. To do this, follow these steps:
- Open Docker Desktop.
- Navigate to Settings > Features in Development.
- Locate the option labeled “Use Rosetta for x86/amd64” and select it.
 Launching the Container
Our system is now prepared to begin running the Microsoft SQL Server Container.
Please open a terminal window and enter the following command, replacing the password with a choice of your own:
docker run -e "ACCEPT_EULA=Y" -e "MSSQL_SA_PASSWORD=VeryStr0ngP@ssw0rd" -p 1433:1433 --name sql --hostname sql --platform linux/amd64 -d mcr.microsoft.com/mssql/server:2022-latestThis action will initiate the download and execution of the official Microsoft Linux SQL Server container designed for x86-64 architecture. Docker, in conjunction with the Apple Rosetta x86 emulator, will manage the process. During the initial setup, some time may be required for the container to become fully operational, as it undertakes the creation of default databases and user profiles. Upon completion, you will gain access to the server through the standard 1433 port.
Important Note: In the event of a server startup failure, common culprits are often a password that is too weak or the occupation of port 1433 by another application. To troubleshoot and acquire new insights for diagnosis, use Docker Desktop to review logs and obtain extra information.
Data Persistence
While your container can function as a fully operational Microsoft SQL Server instance, it’s important to note that removing the container without an external mount can result in the loss of all databases and associated data. This is due to the default internal storage of data within the container. To get over this constraint, create an external mount for the database folder.
By employing an external mount, you ensure that your databases are stored outside the container. As a result, even if the container is deleted, your data remains unaffected. Furthermore, this approach simplifies data sharing, as you can effortlessly duplicate and distribute the database folder to others.
To implement an external mount for your SQL Server container, adhere to the following steps:
- If you followed the previous procedure, proceed to delete the container.
- Open a terminal window.
- Enter the subsequent command, altering the password to a selection of your preference.
docker run -e "ACCEPT_EULA=Y" -e "MSSQL_SA_PASSWORD=VeryStr0ngP@ssw0rd" -p 1433:1433 --name sql --hostname sql --platform linux/amd64 -v /sql_server:/var/opt/mssql -d mcr.microsoft.com/mssql/server:2022-latestWhat have we modified? We introduced the -v or –volume option to attach a volume within our container to a designated local directory. In this instance, we established a connection between the directory /sql_server and the corresponding container directory /var/opt/mssql. You have the flexibility to employ any local directory by adjusting the initial part of the mount command, such as -v /any_folder:/var/opt/mssql.
Please take note: Prior to executing the command, ensure that the designated folder exists to prevent any complications.
Leveraging Docker Compose
While commands provide a convenient means of container management, you can elevate the level of automation and simplicity by crafting a Docker Compose file. The use of a Docker Compose file streamlines task execution, facilitates parameter adjustments, and establishes a comprehensive record of your configuration for future use.
For the creation of a Docker Compose file, adhere to these instructions:
- Establish a fresh directory designated for housing the Docker Compose file.
- Inside the directory, generate a new text file titled docker-compose.yml.
- Access the file using your preferred text editor and inject the ensuing content:
version: '3'

services:

  sql_server:

    image: mcr.microsoft.com/mssql/server:2022-latest

    environment:

      - ACCEPT_EULA=Y

      - SA_PASSWORD=<your_sa_password>

    ports:

      - "1433:1433"

    volumes:

      - <database_folder_path>:/var/opt/mssql/data
Kindly ensure to substitute <your_sa_password> with a robust password designated for the ‘sa’ user, and replace <database_folder_path> with the pertinent path to your external database folder.
Subsequently, instead of manually issuing commands, you can launch your SQL Server container by executing the following command within the directory housing the docker-compose.yml file:
docker-compose up -d This approach significantly streamlines the management of containers and facilitates swift initiation of your SQL Server instance.
Verifying Functionality
Leveraging Parallels Desktop along with a Windows 11 Appliance, you have the option to employ the MSSMS tool (Microsoft SQL Server Management Studio) and establish a connection using your Mac’s IP address.
Congratulations! You should now have Microsoft SQL Server operational on your Apple Silicon-based Mac.
In Conclusion
To sum up, while the process of setting up Microsoft SQL Server on an Apple Silicon Mac may present challenges, it remains attainable through the utilization of Parallels Desktop and Windows 11 ARM. Establishing a virtual environment on your Mac empowers you to seamlessly develop Windows applications that rely on SQL Server while maintaining the integrity of your native macOS experience.
Parallels Desktop offers the capability to operate various operating systems, including Windows 11 ARM, which has been optimized for Apple Silicon Macs. By fully utilizing the capabilities of running Microsoft SQL Server on your Mac thanks to this powerful synergy, you may broaden your development opportunities and guarantee a fluid and effective workflow.
🔥 Unlock amazing savings with our exclusive Parallels Desktop coupon code! Get 25% off the world’s leading virtualization software for Mac.
Don’t miss out on this limited-time offer. Upgrade your productivity today and save big with our discount code!