Even a simple audio or music can bring a dramatic effect on our perception of a video. So if you want to make your self-created video more outstanding, Wondershare Filmora is one of the best choices you can make. Let’s follow us for a simple guide on how to add or replace audio in a video file using this cool video editor (Scroll down for Video tutorial).
About Wondershare Filmora
This program (previously known as Wondershare Video Editor) is an advanced video editing software program that not only can do basic editing processes to your video, it also enable you to polish your video masterpieces fantastically thanks to its built-in editors and special visual effects.
Filmora’s full price is $69.99, but you can download Filmora free here or grab this cool program at the special discount link below.
$69.99 for a lifetime license. But you can buy Filmora with coupon discount (Only $56.69) from Wondershare discount page or download free trial above (The trial version is functionally the same as the paid version except there is a watermark in the new output files.).
Other edition, Filmora 1-year license: $39.99 discount to only $37 (Discount link)
In this article:
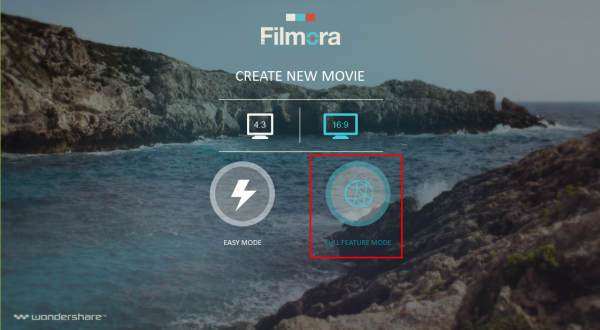
Step 1: Import video file to the program
Run Wondershare Filmora >> Full Featured Mode
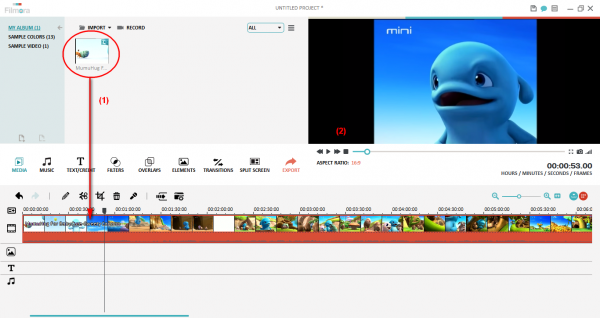
Import your video file to the program or simply drag the file to Import session.
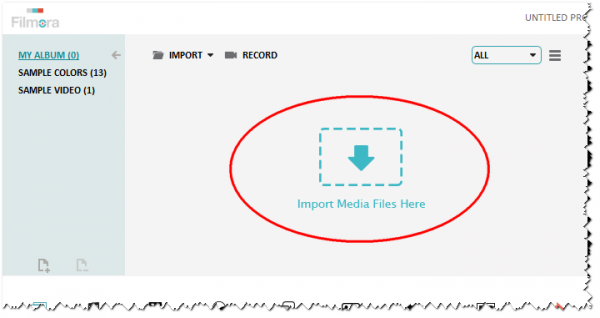
Drag your video file to the Timeline (1). You can also play it for preview in Preview session (2)
Step 2: Add audio to your video file
Click Import button to import the audio file you want to put in the video.
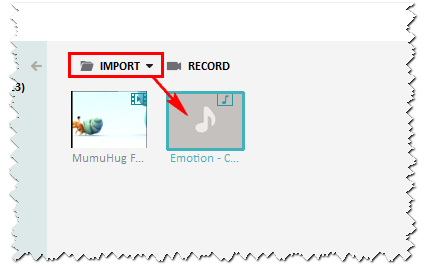
Now, drag this audio file to Music session in Timeline (3)

Note: While dragging the audio, you can choose the start time of the video to add this audio (if you don’t intent to add this audio from the beginning of the video).
Hover you mouse to the end of the audio on Timeline to adjust its length.
Step 3: Add voiceover to video (optional)
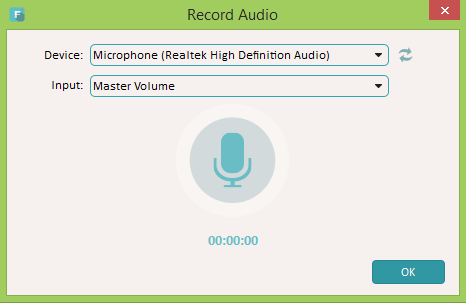
Click on Record button (4) to record your voice for making voice-over >> Click Microphone icon to start recording > OK
Tip: Quickly open voiceover recording by using combined key Alt + R

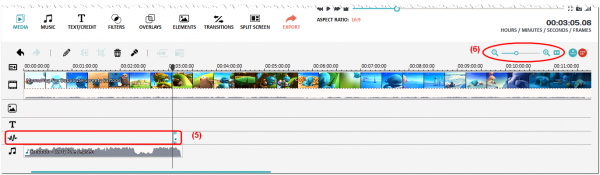
You now can see your voice-over part in Timeline (5). Click and drag it to the position you want to add in the video file.
Tip: Use Zoom In/Out feature (6) to expand the timeline for easier adjustments. Use Voice Changer Software Diamond to do voice-over and voice dubbing for your audio/video clips
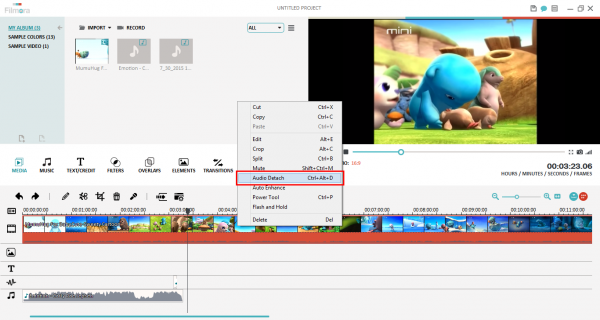
Step 4: Replace audio track of the video
Right-click on the video in Timeline >> Audio Detach (7)
The audio file of your video will appear in the Timeline below your video as yellow-highlighted in the below image:
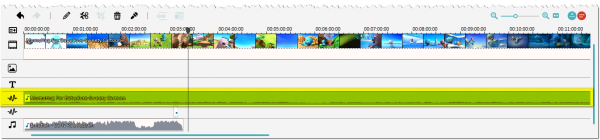
Right-click on the audio file >> Delete (or simply press Del button on your keyboard) to delete the video’s original audio.
Repeat Step 2 to replace it with a new audio file as you wish.
Step 5: Adjust audio file (optional)
To adjust settings for audio file(s), click on Edit button (8) >> change Speed, Volume, Fade In, Fade Out, and Pitch level until you’re happy with its quality >> OK (9).

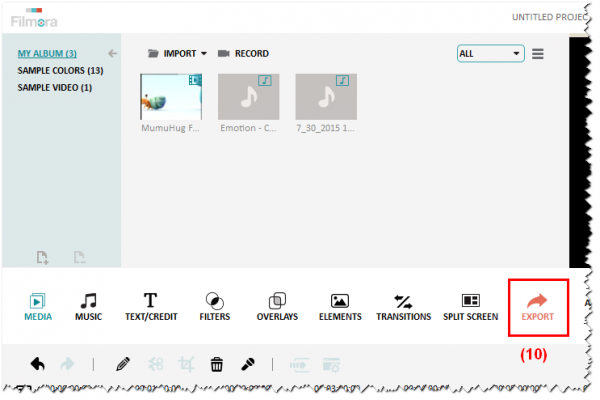
Step 6: Export your final product
When you finish, click Export (10) to save you product.
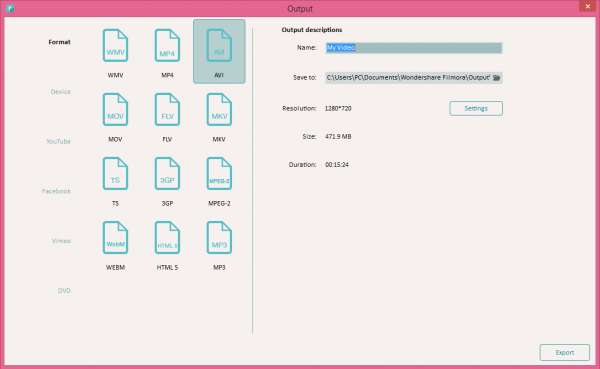
Wondershare Filmora offers users numerous options to save their video masterpiece, including many popular video formats to play on computer, supported formats for portable devices (like iOS, Adroid, Apple TV, Sony TV, Xbox one, Nexus, PS4, …), output video formats for uploading on Youtube, Facebook, Vimeo, and even exporting to DVDs.
Check out this instruction video below for quick understanding:
More guides for using Wondershare Filmora:
- Basic editing with Wondershare Filmora
- Add stunning transitions to media files
- Add texts and introductions to video clip
- And more here
$69.99 for a lifetime license. But you can buy Filmora with coupon discount (Only $56.69) from Wondershare discount page or download free trial above (The trial version is functionally the same as the paid version except there is a watermark in the new output files.).
Other edition, Filmora 1-year license: $39.99 discount to only $37 (Discount link)